Last weekend I replaced a part for my Buccaneer 3D printer that should have gotten it working, and I’m going to tell you all about the process. But first, a little bit of background.
In 2012-2013 I was totally enthralled with 3D printing. At the time, I was excited about the technology’s prospects to change the world, and much like many other emerging technologies (cough VR), I felt the need to get in early. I spent most of my days looking up different 3D printer options, desperately looking for an affordable option to get me into this new technology.
In June of 2013 my hopes were answered, or so I thought, with the Pirate 3D Buccaneer and its Kickstarter campaign that would let me buy a 3D printer for $350. I’m not going to go into the whole history of what happened between then and now, for that you can read my previous story about this printer: Pirate3D Buccaneer: It’s Been A Bit Of A Nightmare But I Finally Have My 3D Printer. For those that don’t like to do their homework, suffice it to say that my printer took a very long time to receive, and it had never completed a successful print.
Eventually my Buccaneer quit on me entirely and I had to deal with the poor customer support from Pirate 3D again. After several emails back and forth, with huge delays between replies (sometimes weeks), the tech support team agreed that I needed a new system board. I was told I’d have to pay for the shipping, in American funds… through Paypal.
I tried to ask if there was any other method of payment, because I was going to get charged extra from the exchange through Paypal. What hurts more is I work for an American company, and get paid in American funds, but because I live in Canada, and our banking systems are different, Paypal won’t accept US funds from a Canadian resident. So despite having US money in my account, I would have to exchange it to Canadian at the bank, then pay Paypal to exchange it back to US funds, costing me quite a bit on a $150 shipping charge.
Unfortunately, I was met with complete radio silence from that point on. Despite my repeated attempts to get a response (I wasn’t about to send $150 to a company that is no longer replying to emails) I didn’t hear anything back again from the individual I was working with. Fast forward two months to December and I finally hear back from the CEO of the company. He told me that the previous tech was no longer with the company and he picked up from where we left off. Only problem was the printer is no longer sold in the form that I have, and parts aren’t really available. It took them three more weeks to source the part.
At this point, it’s back to the payment issue, and to top it off, before that was resolved it was Chinese New Year and the company was closed for two weeks. When they finally came back, I was told there was no other way to get the money to them, so I just had to bite the bullet and pay through Paypal.
A few weeks later I had my parts and could finally get the printer up and running. Wait! Where’s the instructions? All they did was send the part, and when I reached out again it was radio silence. In fact, I’ve still not heard back and it’s not been a few weeks since I received the parts. I eventually just said “screw it! I’ll just figure it out myself!”
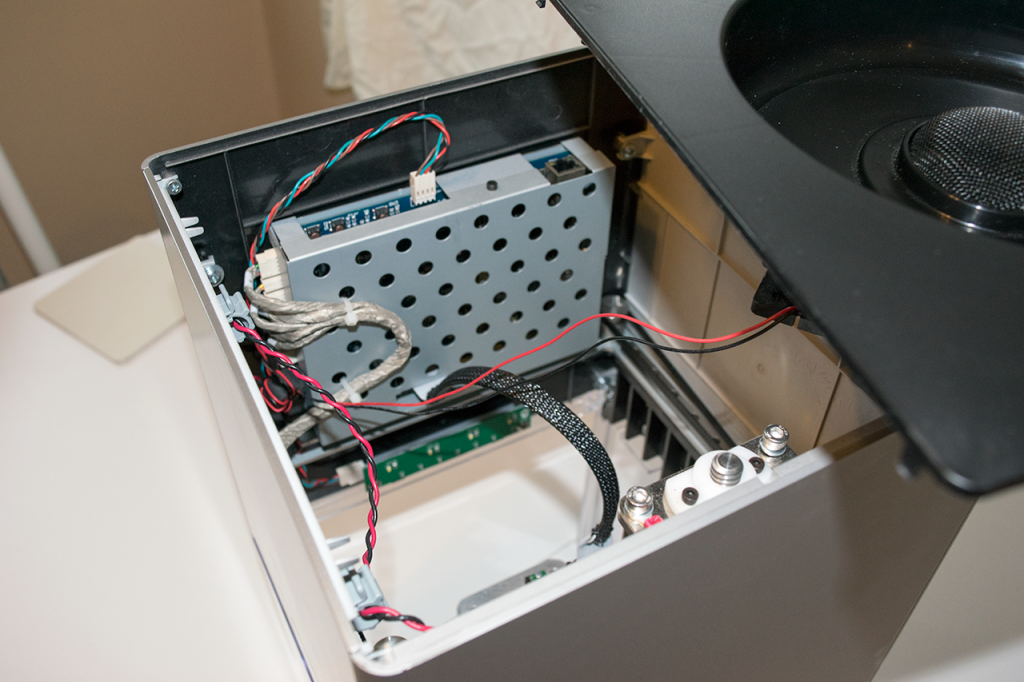
The part that I had to replace is essentially the motherboard of the device. Thankfully I didn’t have to take apart the entire printer to get the old one out. Pirate 3D at least considered that service might be needed from time to time. The board is enclosed in a steel casing and that is attached to the chassis of the printer with two hex head screens. This may have been a problem for some people, but I happen to be into the RC vehicle hobby and those kits use the same kind of screws. My drivers were actually already out for another project.
After removing the two screws, which you can find by looking up into the printer from underneath, there are a number of cables to unplug. One plug powers the fan that is found in the top cover of the printer. The large one goes to the extruder, and the bundle of cables sends data to the different axis motors that control the print heads 3D position. The bundle of cables has clear labels indicating which is which, so I snapped a picture to refer to later.
Once I had the old board out, I noticed that there are two USB ports on it and they were both populated with Edimax USB Wifi dongles. This came as quite a surprise to me. I knew the printer had two wifi radios, one is for the hotspot that the printer creates itself so that you can access it when it is initially set up. The second radio connects to your home’s wifi so that it can be accessed from any computer or devise in the house. The first connection is only used at setup, so it was always confusing to me why this wasn’t just done though a USB cord. Seeing the implementation with USB devices makes it all the more bizarre.
After finding the USB wifi adaptors I was curious, so I took the metal cage off the board and took a peak. Inside, I found a microSD card slot with an 8GB card inside that had a sticker with SW v5.6 written on it.
I then opened up the new board to compare, and to my surprise it was exactly the same board, down to the revision and version of software. The only difference was a little 3D printed clip that held the data cable into its slot. This is a nice addition considering when I first received my printer, that cable had shook loose from its port.
Next, I plugged in the USB wifi adaptors and proceeded to plug in all the cables. Before testing it, I mounted the board to the chassis with both screws. I realized there was a problem when I turned it on though. The motors controlling the movement seemed very out of calibration. It turned out that even though I documented the order, I managed to cross the X and Y axis cables while putting the printer back together.
Once I had that figured out, I turned the printer back on and was able to calibrate it correctly. It took a couple of tries, but it ultimately seemed to be working. I then set up the job that I wanted to print back in the summer, a VR mount for a Leap Motion controller. I watched it go for about five minutes and when I felt satisfied that it was working, I walked away and let it do its thing. When I returned an hour or two later, I was saddened to learn that it didn’t work exactly as I hoped, but it did effectively work.
My next print didn’t go so well. Somehow the calibration is way off again, and I’m pretty sure the print bed is somewhat bent. When I came back after my second print, I realized that the print head had embedded itself into the softer print bed and traced the outline of the job I was printing into the surface.
It looks like I’m back to square one, and now I’m into this printer for as much as I could have bought a good one for. It’s too bad I had to spend nearly $1,000 on this thing and still have nothing useful to show from it. I’m ready to give up on 3D printing. My passion has shifted to VR anyway. Speaking of which, I’ve had enough of working. Time to go play a simulated job!
Kevin Carbotte is Senior Editor, Hardware for AYBOnline.com. He knows a little about a lot, and a lot about a little. The opinions in his columns are his and his alone, but you are free to have them.